Build Your Own High-Performance Filament Dryer: A Step-by-Step Guide
Introduction
For 3D printing enthusiasts, moisture-laden filament is a silent enemy that ruins prints and wastes material. Commercial filament dryers exist, but many leave room for improvement — especially when it comes to venting humid air. Inspired by Saša Karanović’s updated DIY design (version 2), this guide walks you through creating a custom filament dryer that outperforms off-the-shelf units. The V2 iteration features a dedicated PCB, precise temperature and humidity control, and a smartly repurposed food container. By the end, you’ll have a reliable dryer that keeps your spools perfectly conditioned.
What You Need
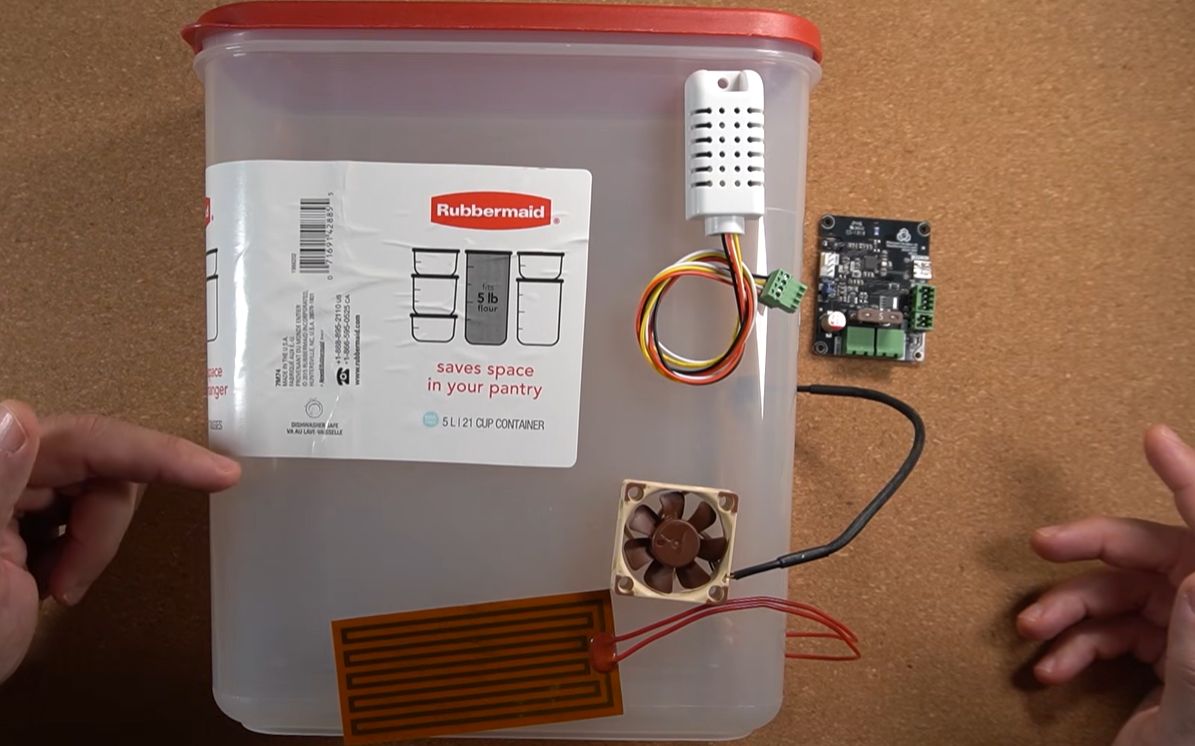
- Container: A 5-liter (or similar) airtight food storage box — choose one that can hold a standard filament spool.
- Controller Board: Custom PCB from the project’s GitHub repository (or build on perfboard if preferred).
- Sensor Kit: One SHT30 digital temperature/humidity sensor + one 100K NTC thermistor (for backup temperature reading).
- Heating Element: 12V polyimide resistive heater (sized to fit inside the container).
- Power Supply: 12V DC adapter (2A or higher, depending on heater rating).
- Wiring & Connectors: JST or screw terminals, 22-26 AWG wire, solder, heat shrink tubing.
- Tools: Soldering iron, drill with hole saws, multimeter, screwdrivers, knife, ruler.
- Optional: Small fan (for active air circulation), desiccant packet, filament spool holder (PTFE tube or bearing).
Step-by-Step Instructions
Step 1: Gather and Prepare the Components
Before you begin, download the project files from the GitHub repository (link in original source). Print or copy the PCB layout if you’re fabricating your own board. Assemble all electronic parts and verify they work with a multimeter. Clean the container thoroughly and remove any labels. Plan the placement of the heater, sensors, and vent holes.
Step 2: Modify the Container
Drill holes in the container lid or sides for the wiring and ventilation. A common approach is to create a small vent slot (about 5–10 mm wide) to allow moist air to escape — this addresses the flaw of saturated air stagnating. Also drill holes for the SHT30 and NTC sensors. If you plan to add a fan, cut a larger opening and mount a mesh guard. Seal all edges with silicone caulk to maintain structural integrity.
Step 3: Install the Heating Element
Attach the 12V polyimide heater to the inside bottom or side wall of the container using thermally conductive adhesive tape or high-temperature epoxy. Ensure the heater lays flat and does not touch the filament spool. Route the heater wires through a dedicated hole and seal it. Test the heater with a temporary 12V supply to confirm it warms up evenly.
Step 4: Mount the Sensors
Place the SHT30 sensor inside the container, ideally near the spool cavity but away from direct heater contact. The NTC thermistor can be placed close to the heater for accurate temperature monitoring. Secure them with small brackets or hot glue. Connect sensor wires to the controller board using the schematic provided in the project docs.
Step 5: Wire the Controller Board
Solder the wires from the sensors, heater, and power supply to the custom PCB as per the circuit diagram. Pay attention to polarity — the polyimide heater is not polarized, but the SHT30 is sensitive to reversed power. Use a multimeter to check for shorts. Optionally add a fuse on the power input for safety. Once wired, double-check all connections.

Step 6: Upload Firmware and Calibrate
Power the board via USB (if it has an onboard microcontroller, e.g., ESP32 or Arduino) and upload the firmware from the GitHub repository. Follow the calibration instructions to set target temperature and humidity thresholds. Typical drying temperature for PLA is 45–50°C; for PETG, 60–70°C. The controller will switch the heater on/off based on feedback from the sensors.
Step 7: Assemble and Test Run
Place the sensor module and heater inside the container. Close the lid and plug in the 12V power supply. Monitor the internal conditions using the display (if included) or serial output. Allow the system to reach setpoint and stabilize. Leave the vent slightly open (e.g., a business card thickness) so humid air can be replaced by drier cooler air — this mimics the recommended practice with commercial dryers like Sunlu units.
Tips for Optimal Use
- Ventilation is key: Without an air exchange, the dryer will fill with moisture-saturated warm air. Always leave a small gap at the lid or install a one-way valve.
- Pre-dry damp spools: If filament has absorbed significant moisture, run the dryer for 4–6 hours before printing. Check the SHT30 readings periodically.
- Safety first: Polyimide heaters can reach high temperatures. Ensure the container is made of heat-resistant plastic (check its rating). Never leave the dryer unattended for long periods.
- Customize for materials: Different filaments need different drying profiles. Store profiles for PLA, ABS, Nylon, etc. Use the NTC sensor as a backup to avoid overheating.
- Consider active circulation: A small 12V fan (like a PC case fan) mounted inside can accelerate moisture removal. Connect it to the same power rail or via a separate switch.
- Documentation matters: Refer to the project’s GitHub for the latest Bill of Materials and PCB design files. Community updates may improve performance further.
With this guide, you’ve transformed a simple storage box into a smart, effective filament dryer. Happy printing — and may your spools stay dry!
Related Articles
- Practical Guide to Adaptive Parallel Reasoning for Smarter LLM Inference
- Securing Linux Against Dirty Frag: A Step-by-Step Guide to Mitigate Root Privilege Escalation
- Trump Mobile T1 Phone: Security Flaws and Disappointing Sales Revealed
- Frontier AI Sparks Race in Cyber Defense: SentinelOne Reveals How Machine-Speed Autonomy Stops Zero-Day Threats
- The Myth of the Unpickable Lock: A Tale of Impressioning and Persistence
- BWH Hotels Data Breach: 10 Critical Facts About the Six-Month Reservation Data Exposure
- 7 Key Shifts in Europe's Cyber Extortion Landscape: Why Germany Has Become the Prime Target
- Exploited Windows Shell Spoofing Bug Forces Emergency Patching Deadline from CISA